


Art is good for kids – and here’s the science why
Plus, five ideas for easy at-home art projects your family will love!
What’s better than new art projects for kids? Whether it’s the depths of winter or a rained-off summer day, creative time can turn around an unplanned weekend day. Plus, science shows that kids who doodle, paint, draw and design aren’t just making art – they’re boosting their brainpower.
For kids, making a masterpiece – or just a stick-figure drawing – is actually a problem-solving project. First a child looks at the materials and decides what they want to make and how they’ll make it. Then they’ll engage motor skills by manipulating tools to make and adjust their art until they’re happy with their creation… or not. (Dealing with disappointment is good life practice, too.)
There’s more – creating art could even make your child a kinder friend. Neurologists have found that creating art at least once a week can increase introspection and empathy because the act strengthens the brain’s default mode network, regions that are active when thinking about others and your own actions. It also reduces stress.
Making original art instead of, say, colouring in a colouring book might have its own benefits as well. Studies have shown that ‘free drawing’ keeps people more focused on the activity that directed art, which significantly improves creative thinking skills.
Not sure where to start? Try one of these DIY art projects for kids. They’re simple, fun and use ingredients you probably already have at home…
DIY art projects for kids
Paper beads
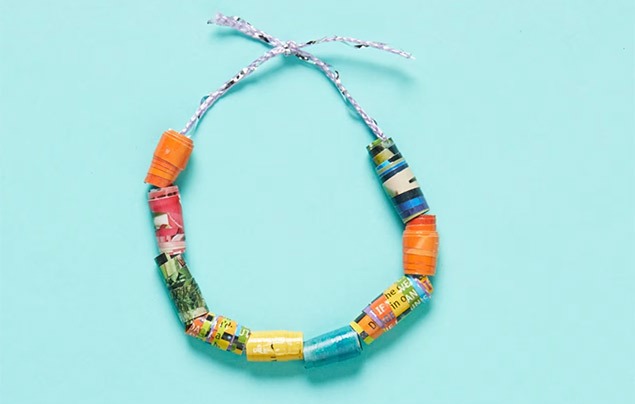
What you’ll need:
- – Colourful pages from old magazines (this is a great way to reuse any beloved old NG KiDS issues!)
- – Scissors
- – Glue stick
- – Pencil
- – Thread
- – Clear nail varnish
What to do:
- 1. Have your kids tear out a colourful page from an old magazine.
- 2. Help them cut the page into long, triangular strips. Start cutting from the top left corner across the page’s width at a slight downward angle. Then cut in the other direction, also at a slight downward angle. (Wider strips make wider beads.)
- 3. Lay a pencil on the wide edge of the triangle strip, then have your kids roll the pencil one time around the strip.
- 4. Use your glue stick to place a thin layer of glue on the rest of the strip before rolling it completely around the pencil.
- 5. Slide the rolled-up paper off your pencil and wait for the glue to dry.
- 6. Paint a layer of clear nail varnish on the outside of the bead.
- 7. Have your kids string the paper beads onto threat to make a necklace or bracelet.
Here’s a kid-friendly version with extra pictures, so your littles can follow along!
Mandala art
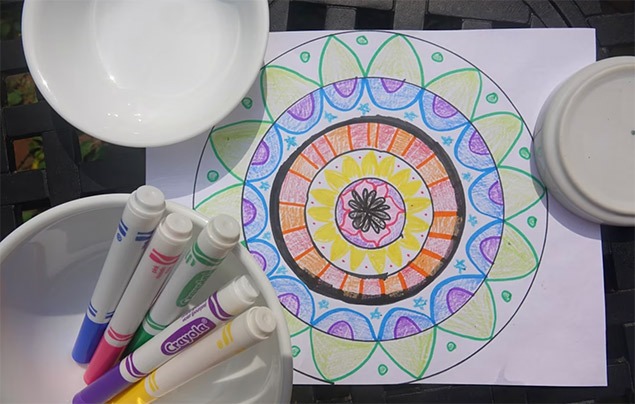
What you’ll need:
- – Paper
- – Different sizes of bowls and cups
- – Pens, felt-tips, coloured pencils or crayons
What to do:
- 1. Gather bowls for your kids to use. On a piece of paper, place the biggest bowl face down and have your kids trace around it with a pen, making a big circle.
- 2. Repeat this step with the second-biggest bowl, tracing it inside the first circle. Repeat this process using smaller and smaller bowls and cups.
- 3. Have your kids create different patterns in the space between the circles, like repeating triangles, flower petals, circles and dots.
- 4. Colour in the shapes using crayons or coloured pencils.
Discover more crafts, art projects and more, with a Nat Geo Kids magazine subscription! Each inspiring issue includes instructions for a fun activity your kids can complete.
Pavement paintings
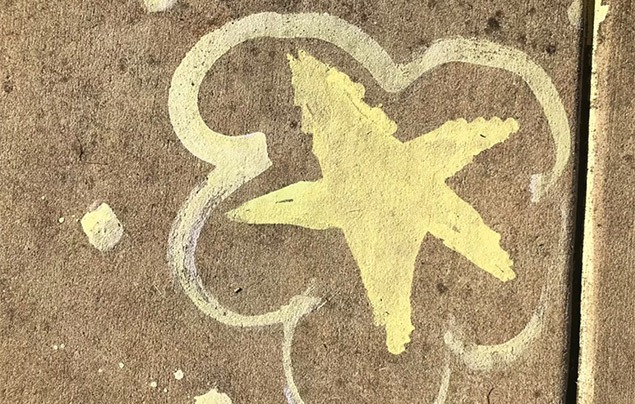
What you’ll need:
- – Mixing bowl
- – Corn starch
- – Food colourings
- – Muffin tin
- – Water
- – Foam brushes or sponges
What to do:
- 1. In a bowl, mix equal parts water and corn starch and stir until combined.
- 2. Equally distribute the mixture in your muffin tin.
- 3. Add one drop of food colouring to each cup.
- 4. Have your kids dip brushes or sponges into the mixture and paint the pavement! The ‘paint’ will wash away with water.
Tie-dye fabric
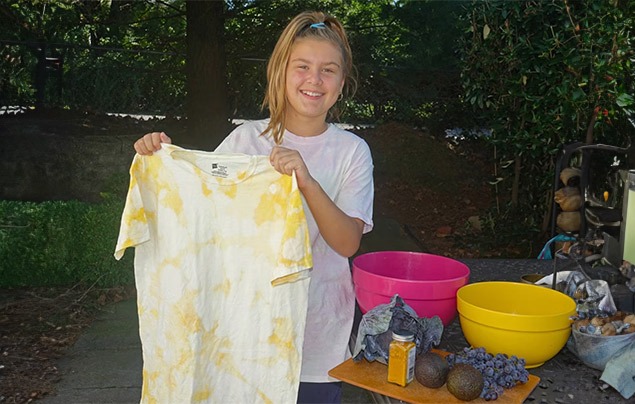
What you’ll need:
- – Two big cooking pots
- – Water
- – White vinegar
- – Salt
- – Food scraps or spices (for pinkish-red use beetroot, cherries or purple cabbage; for yellow, use turmeric or paprika; for pinkish-blue use red grapes; for very light pink use avocado skins and pits. Or try your own!)
- – Strainer
- – Rubber bands
- – White cotton fabric to dye
What to do:
- 1. Place your fabric into a big pot with either water and salt (about 2 litres of water to 125g salt for a fruit dye) or water and vinegar (about one part vinegar to four parts water for a vegetable dye). Bring the mixture to a boil and supervise for one hour, then briefly rinse with cold water.
- 2. While the fabric is boiling, help kids chop the food items and gather about 100g of your scraps or spices and place them in another pot. Fill with enough water to cover them with a few inches of water.
- 3. Under supervision, bring the scraps and water to a boil. Simmer for one hour and remove the dye from the heat. Strain, then discard the scraps into the compost.
- 4. Have your kids arrange their fabric items into funky patterns, like a twisted spiral or scrunched-up ball. They can place rubber bands around it to secure the shape.
- 5. Place the rubber-banded fabric into your saucepan and leave it until the colour is about a shade darker than you’d like your fabric to be – usually for about an hour.
- 6. Remove the rubber bands.
- 7. Heat-set the colour by microwaving your fabric for two minutes, then let it cool.
- 8. Wash the fabric in cold water and dry on high heat.
Homemade watercolours
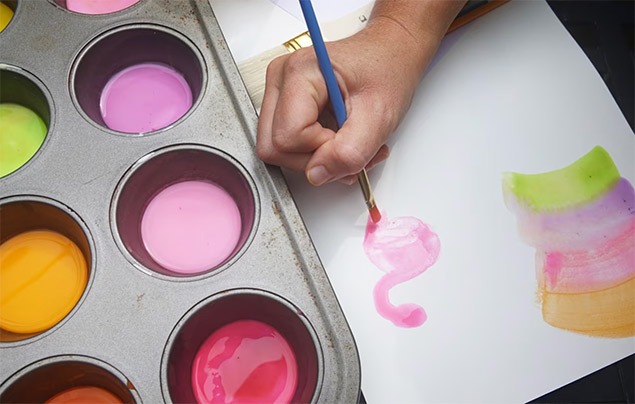
What you’ll need:
- – Mixing bowl
- – Baking soda
- – Vinegar (white, rice, or another colourless variety)
- – Light corn syrup
- – Corn starch
- – Muffin tray or ice cube tray
- – Food colourings
- – Spoon
- – Water
- – Paint brush
What to do:
- 1. In a bowl, have your kids mix four tablespoons of baking soda with four tablespoons of vinegar and wait for the fizzing to stop.
- 2. Ask them to stir in half a teaspoon of corn syrup and two tablespoons of corn starch.
- 3. Evenly distribute the mixture in your tin or tray.
- 4. Add one drop of food colouring to each compartment and mix with a spoon.
Your kids can wait for the mixture to dry overnight like a regular watercolour palette then use water to moisten their brushes, or they can start painting immediately. Here’s a fun spooky craft they can get their paints on!
Looking for more art projects for kids? Try out these bird photography tips, or make some eco-friendly slime!
Written by McKenna Becker. Images © Shannon Hibberd / NG Staff.
MORE LIKE THIS
Eco-friendly life hacks for families
Eco-anxiety: what is it and how can parents help?
Your guide to sustainable shopping

LEAVE A COMMENT
THANK YOU
Your comment will be checked and approved shortly.
WELL DONE,
YOUR COMMENT
HAS BEEN ADDED!
COMMENTS
CUSTOMIZE YOUR AVATAR